|
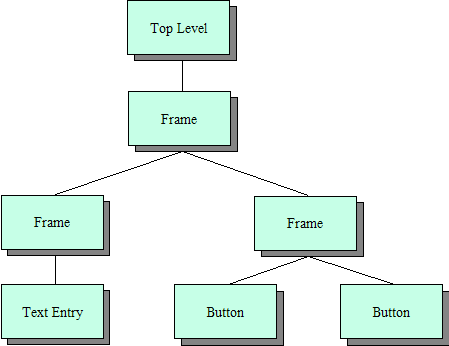
This illustrates the top level widget containing a single Frame which represents the outermost window border. This in turn contains two more Frames, the first of which contains a Text Entry widget and the second contains the two Buttons used to control the application. We will refer back to this diagram later in the topic when we come to build the GUI.
A Tour of Some Common Widgets
In this section we will use the Python interactive prompt to create some simple windows and widgets. Note that because IDLE is itself a Tkinter application you cannot reliably run Tkinter applications within IDLE. You can of course create the files using IDLE as an editor but you must run them from a OS command prompt. Pythonwin users can run Tkinter applications since Pythonwin is built using windows own GUI toolkit, MFC. However even within Pythonwin there are certain unexpected behaviors with Tkinter application. As a result I will use the raw Python prompt from the Operating System.
>>> from Tkinter import *
This is the first requirement of any Tkinter program - import the names of the widgets. You could of course just import the module but it quickly gets tiring typing Tkinter in front of every component name.
>>> top = Tk()
This creates the top level widget in our widget hierarchy. All other widgets will be created as children of this. Notice that a new blank window has appeared complete with an empty title bar save for a Tk logo as icon and the usual set of control buttons (iconify, maximize etc). We will now add components to this window as we build an application.
>>> dir(top)
['_tclCommands', 'children', 'master', 'tk']
The dir function shows us what names are known to the argument. You can use it on modules but in this case we are looking at the internals of the top object, an instance of the Tk class. These are the attributes of top, note, in particular, the children and master attributes which are the links to the widget containment tree. Note also the attribute _tclCommands, this is because, as you might recall, Tkinter is built on a Tcl toolkit called Tk.
>>> F = Frame(top)
Create a Frame widget which will in turn contain the child controls/widgets that we use. Frame specifies top as its first (and in this case only) parameter thus signifying that F will be a child widget of top.
>>> F.pack()
Notice that the Tk window has now shrunk to the size of the added Frame widget - which is currently empty so the window is now very small! The pack() method invokes a Layout Manager known as the packer which is very easy to use for simple layouts but becomes a little clumsy as the layouts get more complex. We will stick with it for now because it is easy to use. Note that widgets will not be visible in our application until we pack them (or use another Layout manager method).
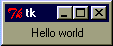
>>> lHello = Label(F, text="Hello world")
Here we create a new object, lHello, an instance of the Label class, with a parent widget F and a text attribute of "Hello world". Notice that because Tkinter object constructors tend to have many parameters (each with default values) it is usual to use the named parameter technique of passing arguments to Tkinter objects. Also notice that the object is not yet visible because we haven't packed it yet.
One final point to note is the use of a naming convention: I put a lowercasel, for Label, in front of a name, Hello, which reminds me of its purpose. Like most naming conventions this is a matter of personal choice, but I find it helps.
>>> lHello.pack()
Now we can see it. Hopefully yours looks quite a lot like this:
We can specify other properties of the Label such as the font and color using parameters to the object constructor too. We can also access the corresponding properties using the configure method of Tkinter widgets, like so:
>>> lHello.configure(text="Goodbye")
The message changed. That was easy, wasn't it? configure is an especially good technique if you need to change multiple properties at once because they can all be passed as arguments. However if you only want to change a single property at a time, as we did above you can treat the object like a dictionary, thus:
>>> lHello['text'] = "Hello again"
which is shorter and arguably easier to understand.
Labels are pretty boring widgets, they can only display read-only text, albeit in various colors, fonts and sizes. (In fact they can be used to display simple graphics too but we won't bother with that here).
Before we look at another object type there is one more thing to do and that's to set the title of the window. We do that by using a method of the top level widget top:
>>> F.master.title("Hello")
We could have used top directly but, as we'll see later, access through the Frame's master property is a useful technique.
>>> bQuit = Button(F, text="Quit", command=F.quit)
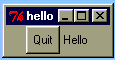
Here we create a new widget a button. The button has a label "Quit" and is associated with the command F.quit. Note that we pass the method name, we do not call the method by adding parentheses after it. This means we must pass a function object in Python terms, it can be a built-in method provided by Tkinter, as here, or any other function that we define. The function or method must take no arguments. The quit method, like the pack method, is defined in a base class and is inherited by all Tkinter widgets, but is usually called at the top window level of the application.
>>>bQuit.pack()
Once again the pack method makes the button visible.
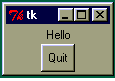
>>>top.mainloop()
We start the Tkinter event loop. Notice that the Python >>> prompt has now disappeared. That tells us that Tkinter now has control. If you press the Quit button the prompt will return, proving that our command option worked. Don't expect the window to close, the python interpreter is still running and we only quit the mainloop function, the various widgets will be destroyed when Python exits - which in real programs is usually immediately after the mainloop terminates!
Note that if running this from Pythonwin or IDLE you may get a slightly different result, if so try typing the commands so far into a Python script and running them from an OS command prompt.
In fact it's probably a good time to try that anyhow, after all it's how most Tkinter programs will be run in practice. Use the principle commands from those we've discussed so far as shown:
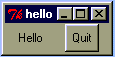
from Tkinter import *

# set up the window itself
top = Tk()
F = Frame(top)
F.pack()

# add the widgets
lHello = Label(F, text="Hello")
lHello.pack()
bQuit = Button(F, text="Quit", command=F.quit)
bQuit.pack()

# set the loop running
top.mainloop()
The call to the top.mainloop method starts the Tkinter event loop generating events. In this case the only event that we catch will be the button press event which is connected to the F.quit method. F.quit in turn will terminate the application and this time the window will also close because Python has also exited. Try it, it should look like this:
Exploring Layout
Note: from now on I'll provide examples as Python script files rather than as commands at the >>> prompt.
In this section I want to look at how Tkinter positions widgets within a window. We already have seen Frame, Label and Button widgets and those are all we need for this section. In the previous example we used the pack method of the widget to locate it within its parent widget. Technically what we are doing is invoking Tk's packer Layout Manager. The Layout Manager's job is to determine the best layout for the widgets based on hints that the programmer provides, plus constraints such as the size of the window as controlled by the user. Some Layout managers use exact locations within the window, specified in pixels normally, and this is very common in Microsoft Windows environments such as Visual Basic. Tkinter includes a Placer Layout Manager which can do this too via a place method. I won't look at that in this tutor because usually one of the other, more intelligent, managers is a better choice, since they take the need to worry about what happens when a window is resized away from us as programmers.
The simplest Layout Manager in Tkinter is the packer which we've been using. The packer, by default, just stacks widgets one on top of the other. That is very rarely what we want for normal widgets, but if we build our applications from Frames then stacking Frames on top of each other is quite a reasonable approach. We can then put our other widgets into the Frames using either the packer or other Layout Manager within each Frame as appropriate. You can see an example of this in action in the Case Study topic.
Even the simple packer provides a multitude of options, however. For example we can arrange our widgets horizontally instead of vertically by providing a side argument, like so:
lHello.pack(side="left")
bQuit.pack(side="left")
That will force the widgets to go to the left thus the first widget (the label) will appear at the extreme left hand side, followed by the next widget (the Button). If you modify the lines in the example above it will look like this:
And if you change the "left" to "right" then the Label appears on the extreme right and the Button to the left of it, like so:
One thing you notice is that it doesn't look very nice because the widgets are squashed together. The packer also provides us with some parameters to deal with that. The easiest to use is Padding and is specified in terms of horizontal padding (padx), and vertical padding(pady). These values are specified in pixels. Let's try adding some horizontal padding to our example:
lHello.pack(side="left", padx=10)
bQuit.pack(side='left', padx=10)
It should look like this:
If you try resizing the window you'll see that the widgets retain their positions relative to one another but stay centered in the window. Why is that, if we packed them to the left? The answer is that we packed them into a Frame but the Frame was packed without a side, so it is positioned top, center - the packers default. If you want the widgets to stay at the correct side of the window you will need to pack the Frame to the appropriate side too:
F.pack(side='left')
Also note that the widgets stay centered if you resize the window vertically - again that's the packers default behavior.
I'll leave you to play with padx and pady for yourself to see the effect of different values and combinations etc. Between them, side and padx/pady allow quite a lot of flexibility in the positioning of widgets using the packer. There are several other options, each adding another subtle form of control, please check the Tkinter reference pages for details.
There are a couple of other layout managers in Tkinter, known as the grid and the placer. To use the grid manager you use grid() instead of pack() and for the placer you call place() instead of pack(). Each has its own set of options and since I'll only cover the packer in this intro you'll need to look up the Tkinter tutorial and reference for the details. The main points to note are that the grid arranges components in a grid (surprise!) within the window - this can often be useful for dialog boxes with lined up text entry boxes, for example. The placer user either fixed coordinates in pixels or relative coordinates within a window. The latter allow the component to resize along with the window - always occupying 75% of the vertical space say. This can be useful for intricate window designs but does require a lot of pre-planning - I strongly recommend a pad of squared paper, a pencil and eraser!
Controlling Appearance using Frames and the Packer
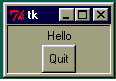
The Frame widget actually has a few useful properties that we can use. After all, it's very well having a logical frame around components but sometimes we want something we can see too. This is especially useful for grouped controls like radio buttons or check boxes. The Frame solves this problem by providing, in common with many other Tk widgets, a relief property. Relief can have any one of several values: sunken, raised, groove, ridge or flat. Let's use the sunken value on our simple dialog box. Simply change the Frame creation line to:
F = Frame(top, relief="sunken", border=1)
Note 1:You need to provide a border too. If you don't the Frame will be sunken but with an invisible border - you don't see any difference!
Note 2: that you don't put the border size in quotes. This is one of the confusing aspects of Tk programming is knowing when to use quotes around an option and when to leave them out. In general if it's a numeric or single character value you can leave the quotes off. If it's a mixture of digits and letters or a string then you need the quotes. Likewise with which letter case to use. Unfortunately there is no easy solution, you just learn from experience - Python often gives a list of the valid options in it's error messages!
One other thing to notice is that the Frame doesn't fill the window. We can fix that with another packer option called, unsurprisingly, fill. When you pack the frame do it thusly:
F.pack(fill="x")
This fills horizontally, if you want the frame to fill the entire window just use fill='y' too. Because this is quite a common requirement there is a special fill option called BOTH so you could type:
F.pack(fill="both")
The end result of running the script now looks like:
Adding more widgets
Let's now look at a text Entry widget. This is the familiar single line of text input box. It shares a lot of the methods of the more sophisticated Text widget which we won't look at here. Essentially we will simply use it to capture what the user types and to clear that text on demand.
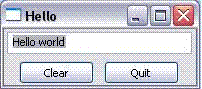
Going back to our "Hello World" program we'll add a text entry widget inside a Frame of its own and a button that can clear the text that we type into it. This will demonstrate not only how to create and use the Entry widget but also how to define our own event handling functions and connect them to widgets.
from Tkinter import *

# create the event handler first
def evClear():
  eHello.delete(0,END)

# create the top level window/frame
top = Tk()
F = Frame(top)
F.pack(expand="true")

# Now the frame with text entry
fEntry = Frame(F, border=1)
eHello = Entry(fEntry)
fEntry.pack(side="top", expand="true")
eHello.pack(side="left", expand="true")

# Finally the frame with the buttons.
# We'll sink this one for emphasis
fButtons = Frame(F, relief="sunken", border=1)
bClear = Button(fButtons, text="Clear Text", command=evClear)
bClear.pack(side="left", padx=5, pady=2)
bQuit = Button(fButtons, text="Quit", command=F.quit)
bQuit.pack(side="left", padx=5, pady=2)
fButtons.pack(side="top", expand="true")

# Now run the eventloop
F.mainloop()
Note that once more we pass the name of the event handler (evClear)., without parentheses, as the command argument to the bClear button. Note also the use of a naming convention, evXXX to link the event handler with the corresponding widget.
Running the program yields this:
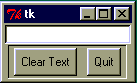
And if you type something in the text entry box then hit the "Clear Text" button it removes it again.
Binding events - from widgets to code
Up till now we have used the command property of buttons to associate Python functions with GUI events. Sometimes we want more explicit control, for example to catch a particular key combination. The way to do that is use the bind function to explicitly tie together (or bind) an event and a Python function.
We'll now define a hot key - let's say CTRL-c - to delete the text in the above example. To do that we need to bind the CTRL-C key combination to the same event handler as the Clear button. Unfortunately there's an unexpected snag. When we use the command option the function specified must take no arguments. When we use the bind function to do the same job the bound function must take one argument. This we need to create a new function with a single parameter which calls evClear. Add the following after the evClear definition:
def evHotKey(event):
    evClear()
And add the following line following the definition of the Entry widget:
eHello.bind("<Control-c>",evHotKey) # the key definition is case sensitive
Run the program again and you can now clear the text by either hitting the button or typing Ctrl-c. We could also use bind to capture things like mouse clicks or capturing or losing Focus or even the windows becoming visible. See the Tkinter documentation for more information on this. The hardest part is usually figuring out the format of the event description!
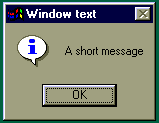
A Short Message
You can report short messages to your users using a MessageBox. This is very easy in Tk and is accomplished using the tkMessageBox module functions as shown:
import tkMessageBox
tkMessageBox.showinfo("Window Text", "A short message")
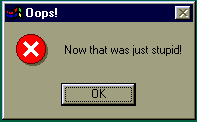
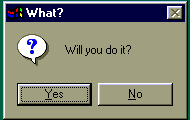
There are also error, warning, Yes/No and OK/Cancel boxes
available via different showXXX functions. They are
distinguished by different icons and buttons. The latter two
use askXXX instead of showXXX and return
a value to indicate which button the user pressed, like so:
res = tkMessageBox.askokcancel("Which?", "Ready to stop?")
print res
Here are some of the Tkinter message boxes:
Wrapping Applications as Objects
It's common when programming GUI's to wrap the entire application as a class. This begs the question, how do we fit the widgets of a Tkinter application into this class structure? There are two choices, we either decide to make the application itself as a subclass of a Tkinter Frame or have a member field store a reference to the top level window. The latter approach is the one most commonly used in other toolkits so that's the approach we'll use here. If you want to see the first approach in action go back and look at the example in the Event Driven Programming topic. (That example also illustrates the basic use of the incredibly versatile Tkinter Text widget)
I will convert the example above using an Entry field, a Clear button and a Quit button to an OO structure. First we create an Application class and within the constructor assemble the visual parts of the GUI.
We assign the resultant Frame to self.mainWindow, thus allowing other methods of the class access to the top level Frame. Other widgets that we may need to access (such as the Entry field) are likewise assigned to member variables of the Frame. Using this technique the event handlers become methods of the application class and all have access to any other data members of the application (although in this case there are none) through the self reference. This provides seamless integration of the GUI with the underlying application objects:
from Tkinter import *

class ClearApp:
   def __init__(self, parent=0):
      self.mainWindow = Frame(parent)
      # Create the entry widget
      self.entry = Entry(self.mainWindow)
      self.entry.insert(0,"Hello world")
      self.entry.pack(fill=X)

      # now add the 2 buttons, use a grooved effect
      fButtons = Frame(self.mainWindow, border=2, relief="groove")
      bClear = Button(fButtons, text="Clear",
                      width=8, height=1, command=self.clearText)
      bQuit = Button(fButtons, text="Quit",
                      width=8, height=1, command=self.mainWindow.quit)
      bClear.pack(side="left", padx=15, pady=1)
      bQuit.pack(side="right", padx=15, pady=1)
      fButtons.pack(fill=X)
      self.mainWindow.pack()

      # set the title
      self.mainWindow.master.title("Clear")

   def clearText(self):
      self.entry.delete(0,END)

app = ClearApp()
app.mainWindow.mainloop()
Here's the result:
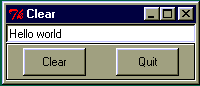
The result looks remarkably like the previous incarnation although I have tweaked the lower frame to give it a nice grooved finish and I've supplied widths to the buttons to make them look more similar to the wxPython example below.
Of course its not just the main application that we can wrap up as an object. We could create a class based around a Frame containing a standard set of buttons and reuse that class in building dialog windows say. We could even create whole dialogs and use them across several projects. Or we can extend the capabilities of the standard widgets by subclassing them - maybe to create a button that changes colour depending on its state. This is what has been done with the Python Mega Widgets (PMW) which is an extension to Tkinter which you can download.
An alternative - wxPython
There are many other GUI toolkits available but one of the most popular is the wxPython toolkit which is, in turn, a wrapper for the C++ toolkit wxWidgets. wxPython is much more typical than Tkinter of GUI toolkits in general. It also provides more standard functionality than Tk "out of the box" - things like tooltips, status bars etc which have to be hand crafted in Tkinter. We'll use wxPython to recreate the simple "Hello World" Label and Button example above.
I won't go through this in detail, if you do want to know more about how wxPython works you will need to download the package from the wxPython website.
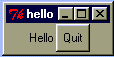
In general terms the toolkit defines a framework which allows us to create windows and populate them with controls and to bind methods to those controls. It is fully object oriented so you should use methods rather than functions. The example looks like this:
import wx

# --- Define a custom Frame, this will become the main window ---
class HelloFrame(wx.Frame):
   def __init__(self, parent, id, title, pos, size):
        wx.Frame.__init__(self, parent, id, title, pos, size)
       # we need a panel to get the right background
        panel = wx.Panel(self)

        # Now create the text and button widgets
        self.tHello = wx.TextCtrl(panel, -1, "Hello world", pos=(3,3), size=(185,22))
        bClear = wx.Button(panel, -1, "Clear", pos=(15, 32))
        self.Bind(wx.EVT_BUTTON, self.OnClear, bClear)
        bQuit = wx.Button(panel, -1, "Quit", pos=(100, 32))
        self.Bind(wx.EVT_BUTTON, self.OnQuit, bQuit)

   # these are our event handlers
   def OnClear(self, event):
       self.tHello.Clear()

   def OnQuit(self, event):
       self.Destroy()


# --- Define the Application Object ---
# Note that all wxPython programs MUST define an
# application class derived from wx.App
class HelloApp(wx.App):
   def OnInit(self):
       frame = HelloFrame(None, -1, "Hello", (200,50), (200,90) )
       frame.Show(True)
       self.SetTopWindow(frame)
       return True

# create instance and start the event loop
HelloApp().MainLoop()
And it looks like this:
Points to note are the use of a naming convention for the methods that get called by the framework - OnXXXX. Also note the EVT_XXX constants used to bind events to widgets - there is a whole family of these. wxPython has a vast array of widgets, far more than Tkinter, and with them you can build quite sophisticated GUIs. Unfortunately they tend to use a coordinate based placement scheme which becomes very tedious after a while. It is possible to use a scheme very similar to the Tkinter packer but its not so well documented.
Incidentally it might be of interest to note that this and the very similar Tkinter example above have both got about the same number of lines of executable code - Tkinter: 19, wxPython: 21.
In conclusion, if you just want a quick GUI front end to a text based tool then Tkinter should meet your needs with minimal effort. If you want to build full featured cross platform GUI applications look more closely at wxPython.
Other toolkits include MFC and .NET and of course there is the venerable curses which is a kind of text based GUI! Many of the lessons we've learned with Tkinter apply to all of these toolkits but each has its own characteristics and foibles. Pick one, get to know it and enjoy the wacky world of GUI design. Finally I should mention that many of the toolkits do have graphical GUI builder tools, for example Qt has Blackadder and GTK has Glade. wxPython has Python Card which tries to simplify the whole wxPython GUI building process. There is also a free GUI builder, Boa Constructor, available although still only in Alpha release state. There is even a GUI builder for Tkinter called SpecTix , based on an earlier Tcl tool for building Tk interfaces, but capable of generating code in multiple languages including Python. There is also an enhanced set of widgets for Tkinter called Tix which has recently been added to the standard Python library ( and another popular add-in is the Python Mega-Widgets (PMW)) to fill the gap between the basic Tkinter set and those provided by wxPython etc.
That's enough for now. This wasn't meant to be a Tkinter reference page, just enough to get you started. See the Tkinter section of the Python web pages for links to other Tkinter resources.
There are also several books on using Tcl/Tk and at least one on Tkinter. I will however come back to Tkinter in the case study, where I illustrate one way of encapsulating a batch mode program in a GUI for improved usability.
| Things to remember |
|---|
|
Previous Next Contents
If you have any questions or feedback on this page send me mail at: alan.gauld@yahoo.co.uk